No need to adjust your computer screens.  Today's recipe really is a Cucumber Limeade, also known as Agua de Pepino.

Now, I know that your all thinking that drinking a cucumber flavored beverage isn't something that appeals to you.  I felt the same way when I first heard of Agua de Pepino.  I remember thinking, "Cucumber water, really?  That's just wrong!"

But once I tasted it, I was completely won over by the refreshing combination of the two flavors, that just seem to complement each other so well.

Agua de Pepino is my go-to beverage when the temperatures and humidity are soaring.  I really hope you will give this recipe a try.   

Agua de Pepino

Ingredients:

  • 1 large cucumber, peeled and cut in large chunks
  • 3 limes or 6 key limes, cut in half
  • 1-1/3 cups sugar
  • Water
  • Ice


Directions:
Place the cucumber in a blender cup.  Fill the blender cup with water.


Puree until smooth.


Strain the cucumber puree into a 4-quart pitcher. 


Rinse out the blender cup, if desired.  Place the lime halves in the blender cup.  I was only able to find small limes, so I used 6 of them.  But if you're lucky enough to find large limes, you'll only need three.

Fill the blender cup with water. 


Now, with this next step, you HAVE to follow directions, so read the instructions carefully.

You're only going to pulse the blender for 3 to 4 seconds.  (I've mentioned this trick before in my recipe for Easy Agua de Limon.)  If you puree it too long, you'll end up grinding up the white part of the zest, which will result in a very bitter agua fresca.  And we really don't want that to happen.


Strain the lime puree into the pitcher with the cucumber puree.  Add enough water to the pitcher to fill it.  Sweeten your Agua de Pepino with sugar.  Refrigerate until ready to use.


Before serving, wet the rim of your serving glasses with lime or lemon juice, then dip the rim in granulated sugar.  (This step is completely optional, but doesn't it look pretty?)


Serve with or without ice and garnish with a lime or cucumber slice.  Enjoy!!!

agua de pepino-cucumber limeade

Photobucket

Cucumber Limeade {Agua de Pepino}

The six years that Hubby and I lived together in the United States, we had one recurring argument.

It happened every year during Strawberry season.

As soon as Hubby bit into the first strawberry of the season he would always say, "The strawberries in Mexico are better."

"The strawberries in Mexico are bigger."

"The strawberries in Mexico are sweeter."

He felt the same way about peaches too.

I didn't recall ever eating a strawberry in Mexico, so I had no idea if he was right or not.  But I felt it was my duty as a proud American to defend my country's strawberries.   

"You don't know what you're talking about!  The strawberries in the U.S. are sweet and delicious.  And well, we all know that size doesn't matter."

It was the same exact argument every time we bought strawberries.  It even became a running joke between one of my best friends from high school and me.

The first letter I received from my friend G, she asked me about the strawberries.  It was almost winter, so there were no strawberries in sight.  But I could not wait until Spring to find out once and for all, which strawberries were the best.

Hubby often argued that the strawberries in the U.S. weren't sweet at all and that he needed to sprinkle sugar on top to be able to eat them.

Well, imagine my surprise when I bit into my very first Mexican strawberry.

It wasn't anything like I expected.  I'll give Hubby this, the strawberries were big.  Very big.  But they didn't have the sweet strawberry aroma that I was used to and they weren't sweet at all.

Hubby was the first to bring out the sugar bowl. 


Now, I'm not saying that all of the strawberries in Mexico are awful.  The state of Irapuato is famous for it's strawberries.  I don't need to travel so far to find a good strawberry.  There is a little ranch community not far from where I live that grows organic strawberries.  They're not as big as the first strawberries I tasted, but they are deliciously sweet and smell absolutely delightful. 

No matter where your strawberries are from, they are always delicious in a tall glass of Agua de Fresa. 


Agua de Fresa

Ingredients:

  • 1-1/2 pounds strawberries (stems removed)
  • 12 to 15 cups water
  • 1 to 1-1/2 cups sugar (depending on how sweet your strawberries are)


Directions:
Before you start, rinse the strawberries to remove any dirt.  Remove the stems if you haven't done so already.  Place the strawberries in a blender cup.  Fill the blender cup with enough water to cover strawberries.  Puree until smooth. 


Strain strawberry puree into a 4-quart pitcher.  Add enough water to fill the pitcher.  Sweeten the Agua de Fresa with sugar.  Refrigerate until ready to serve.


Serve with or without ice.  Garnish the glass with a fresh strawberry.  Enjoy!!!


Yields 4 quarts


Photobucket
Linking up with Gooseberry Patch Strawberry Recipe Round-Up


The Great Strawberry Debate {Agua de Fresa}


Today I'm going to introduce you to an ingredient that I always keep on hand in my pantry.

So what is this mystery ingredient?  Pinguica!

Pinguica is dried manzanita that has been ground into a fine powder.  This powder is used to make a delicious Agua Fresca called Agua de Pinguica.  Think of pinguica as being an all natural instant iced tea mix.   That's exactly what I thought Agua de Pinguica tasted like the first time I tried it...Iced Tea.

I know pinguica is readily available here in Mexico, but I'm not sure if it's available in the U.S.  Is it available where you live?

 
Agua de Pinguica

Ingredients:

  • 2 heaping tablespoons pinguica powder
  • 2 quarts water (8 cups)
  • 2/3 to 1 cup sugar


Directions:
In a 2-quart pitcher, dissolve the 2 heaping tablespoons of pinguica powder in 8 cups of water.  (A little pinguica powder goes a long way!)


 Stir in the sugar, making sure that both the pinguica and sugar have dissolved.


 Serve en las rocas (on the rocks).  Enjoy!!! 


Photobucket

Mystery Ingredient: Pinguica {Agua de Pinguica}


One of things I love about living in Mexico is that there is always something to celebrate.  And today is not the exception.

Today is a particularly festive day all throughout Mexico and in the Limón household.  It is El Dia del Niño (Children's Day). 

In our family, the kiddies get the day off.  No chores.  No homework.  They have the entire day to do as they please.  And they decide what we will be having for lunch...an extra large pizza with pepperoni, chorizo and jalapeño peppers.

Our Dia del Niño celebration wouldn't be complete without a cake.  This year, my kiddies chose a Rainbow Cake.  I made them one for St. Patrick's day and they loved it so much that they requested it again for El Dia del Niño.

Making a rainbow cake couldn't be easier.  You start with a box mix, prepare according to package directions and color the batter with food coloring.  See?  Piece of cake.  (Pun totally intended.) 

Before we start, let's talk about food coloring.  I recommend that you use gel food coloring.  You get great color results and it won't water down your batter like using the liquid food coloring.

If you're like me and your living in a small town in Mexico, where gel food coloring isn't available, fear not.  Just head to one of the local mom & pop farmacias (pharmacy) and ask them for pintura vegetal.  It's powdered food coloring and comes in tiny brown paper envelopes in a variety of colors including: Azul (blue), Verde (green), Rojo (red) and Amarillo Huevo (egg yellow).  And best of all it's very inexpensive.  I bought 8 envelopes for 4 pesos.  (Less than 40 cents). 


Rainbow Cake

Ingredients:

  • 1 box Betty Crocker French Vanilla cake mix
  • 1-1/4 cups water
  • 1/3 cup vegetable oil
  • 3 eggs
  • Gel food coloring (red, orange, yellow, blue, green, purple)
  • White Frosting 


Directions:
Preheat oven to 350F.  Prepare the cake mix according to package directions.


Divide the cake batter into 6 bowls.  (About 3/4 cup of batter per bowl.)


Tint the cake batter with food coloring.


Pour the cake batter, one color at a time, into the center of a greased and floured cake pan.  I started with the purple, then continued to pour each color of batter directly into the center of the previous color.


I used two 9-inch rounds, but you could also use one 10 x 3 round pan. 


Bake at 350F, according to package directions.  I baked my two rounds for 25 minutes.


Fill and frost with your choice of frosting.  I prefer using a cream cheese frosting, but for this particular cake, I used ready made white frosting.  (Gasp!) (Hangs head in shame.)  In my defense, my electric mixer died on New Year's and I'm hoping the "kiddies" will gift me a new one for Mother's Day.   


Enjoy!!!


And watch how your kiddies will gobble this cake right up!


Photobucket

For the Kid In All of Us {Rainbow Cake}


A bottle of hot sauce is an important staple in any Mexican pantry.  I always have two bottles on hand.  One is a local brand of hot sauce made with Yahualica chiles de arbol (the best chile de arbol in the world) that my Hubby can't live without.  And the other is one both my kiddies and I love...Valentina hot sauce.

Salsa Valentina isn't one of those hot sauces that will burn your tongue off.  It's mildly spicy, but it has a sweetness to it that adds to the delicious flavor.

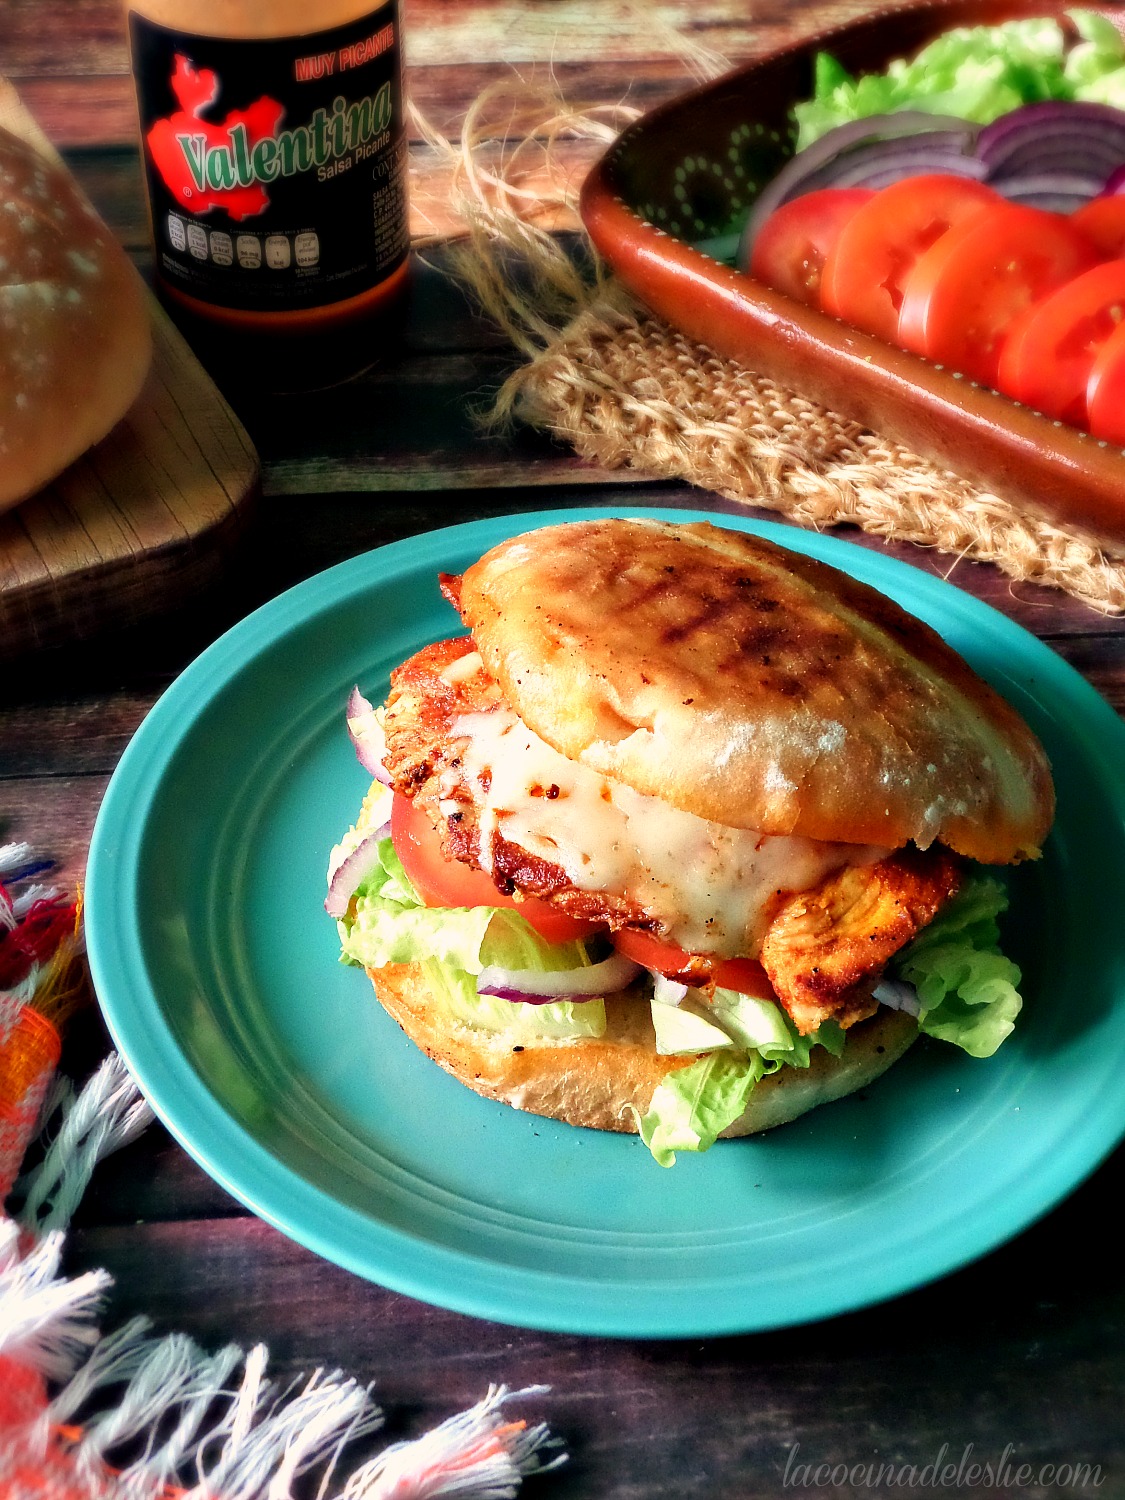
As I've said before, my kiddies love to put Salsa Valentina on everything from scrambled eggs to a platter of chopped fruit.  I like to incorporate Salsa Valentina into my recipes, like Valentina Hot Wings and this spicy chicken sandwich that I'm going to share with you today.

If you like spicy buffalo wings, then you are going to love this recipe.

For this recipe, I asked my butcher to slice my boneless, skinless chicken breasts into 1/4-inch thick slices.  But you could also use chicken cutlets. 


Valentina Chicken Sandwiches

Ingredients:

  • 2 pounds chicken breast cutlets
  • 1 cup flour
  • 1 teaspoon seasoning salt
  • 1 cup milk
  • 3/4 cup Valentina hot sauce
  • Bolillo Rolls
  • Ranch or Bleu Cheese Dressing
  • Lettuce
  • Sliced tomato
  • Sliced red onion


Directions:
Season the chicken cutlets with salt and pepper; refrigerate until ready to use.  Combine the flour and seasoning salt in a medium bowl.  Pour the milk into a separate bowl.

Dip the chicken cutlets in the milk.


Then dip the chicken cutlets in the flour, making sure that both sides are evenly coated.


For a lower fat version of this recipe, you can brown the cutlets on a non-stick griddle over medium high heat.


Or heat 1/2 cup olive or vegetable oil in a large skillet.


Fry the chicken cutlets in the skillet until golden brown on both sides.  Transfer the cooked chicken to a heatproof plate and continue cooking the remaining chicken cutlets.


Once all of the chicken cutlets have been cooked, carefully wipe the skillet with a paper towel to remove any excess oil.  Pour the Valentina hot sauce into the skillet and bring to a simmer over low heat.


Carefully add the chicken cutlets to the hot sauce, making sure to turn the cutlets over to coat both sides with plenty of hot sauce. Cover and let simmer until the sauce has reduced slightly.


Cut the bolillo rolls in half lengthwise and lightly toast them on a griddle or comal.  Spread your choice of ranch or bleu cheese dressing on the cut sides of the bolillo rolls.


Top one bolillo half with lettuce, tomato and onion and the other with one to two chicken cutlets.


Close the sandwiches and serve with carrot sticks and additional dressing for dipping.  Enjoy!!!


Photobucket
Linking up this week with:

Miz Helen’s Country Cottage


Spicy Valentina Chicken Sandwiches

I don't know about you, but I really don't like serving the same side dishes over and over, no matter how delicious they are.  I like to mix things up a bit.  One of my favorite ways of doing so is by serving Arroz Verde (green rice).  A savory rice dish with an explosion of flavors. 

Arroz Verde

Ingredients:

  • 2 tomatillos
  • 1 poblano chile
  • 1 sprig cilantro
  • 1 clove garlic
  • 1 teaspoon chicken bouillon
  • 1/2 medium onion
  • 2-1/2 cups chicken broth or water
  • 1 cup long grain rice
  • 1 tablespoon chopped cilantro


Directions:
Place the tomatillos, poblano chile, cilantro, garlic, chicken bouillon, onion and chicken broth in a blender cup.


Puree until smooth.  Set aside.


In a medium skillet or saucepan, heat 2 tablespoons of olive oil over medium-high heat.  Brown the rice in the oil until it turns a light golden brown.


Carefully pour the puree mixture into the skillet with the rice; season with salt.  Cover skillet and bring rice to a boil.  Reduce heat to low and let simmer until all of the liquid has been absorbed.  (Remember: You MUST resist the urge to stir.  You want a nice fluffy rice, not a creamy risotto.) 


Once rice has finished cooking, remove from heat and let set for 10 to 15 minutes before serving.  Toss with chopped cilantro.  Enjoy!!!


Photobucket

Arroz Verde