Showing posts with label Yeast breads. Show all posts
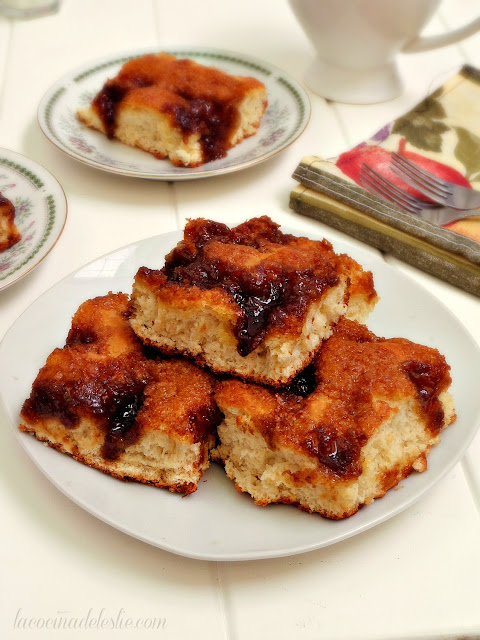
Brunsviger is a classic Danish coffee cake with a buttery sweet brown sugar and cinnamon glaze.


Brunsviger (Danish Coffee Cake) - lacocinadeleslie.com

One of my favorite things about The Secret Recipe Club. is discovering new-to-me cuisines and/or recipes that I might not have ever thought to make. My assignment this month is Sid's Sea Palm Cooking. Sid loves preparing good food and sharing it with friends, so much so that she hosts a monthly Tapas Night in her home and later shares photos and recipes on her blog. Sid's blog is full of delicious and easy-to-follow recipes, but what really drew me in were her authentic Danish recipes. My mouth was watering just reading through the recipes. Asier (Danish pickles), Skidne æg (hard-boiled eggs in mustard sauce), Lagekage (Danish layer cake), and Melboller (flour dumplings) which Sid says are perfect for soup. are all on my list of Sid's Danish recipes to try. I ended up choosing Brunsviger because the words Danish Coffee Cake just spoke to me.

Secret Recipe Club: Brunsviger (Danish Coffee Cake)


Chorreadas con Queso - lacocinadeleslie.com


Today is a very special day for Girlichef and I.  We're celebrating our 1 year anniversary of She Made/Ella Hace!  I can't believe we've already reached the one year mark.  I've had so much fun cooking along side Heather each month that I completely lost track of time.

In honor of our one year anniversary, and because the very first recipe we made for She Made/Ella Hace was for our all-time favorite pan dulce (Mexican pastry), Conchas, I suggested to Heather that we should celebrate by making another pan dulce recipe, only this time we'd each make one of our favorites.

Piloncillo (aka Dulce Macho

While Conchas will always be my favorite pan dulce, I also love Puerquitos (which Girlichef is making today) and empanadas.  But here in Yahualica, there's another pan dulce, that I don't think many people know about, that holds the top spot in my heart...Chorreadas.

Chorreadas are a whole wheat pan dulce, that are traditionally stuffed and topped with lots of crumbled piloncillo, that when baked becomes a syrupy, sticky, sweet filling that drips all over the sweet wheat bread.  Hence the name, Chorreadas.

Queso Fresco 

My favorite Chorreadas however are Chorreadas con Queso, which are also filled with the sticky sweet piloncillo, but with the added bonus of lots of ooey-gooey melted queso fresco, that adds texture and a slight saltiness that perfectly balances the sweetness of the piloncillo.


Chorreadas con Queso

Ingredients:
  • 2-1/2 cups all-purpose flour
  • 2-1/4 cups whole wheat flour
  • 3/4 cup granulated sugar
  • 1 teaspoons salt
  • 1 packet instant yeast
  • 1 cup milk
  • 1/3 cup butter
  • 2 eggs
  • Queso Fresco
  • 3 to 4 cups crumbled Piloncillo (Dulce Macho)

Directions:
In a large bowl, combine the all-purpose flour, whole wheat flour, sugar, salt, and instant yeast; set aside.  In a small saucepan, heat the milk and butter over medium-low heat, just until the butter has completely melted.  Stir the warm milk into the flour mixture along with the eggs.  Mix until well combined.


Turn the dough out onto a lightly floured surface.  Knead the dough for a few minutes until it comes together and feels smooth and elastic.  Place dough in a lightly greased bowl; cover and let proof (rise) for 1-1/2 hours or until double in size.


Divide dough into 4 equal parts.


On a lightly floured surface, roll out each piece of dough into a 10-inch circle.  Place one circle of dough on a lightly greased baking sheet or cast iron comal (griddle).


Sprinkle about 1-1/2 cups of chopped piloncillo over the dough.  (You can use as little or as much as you like. Just remember that the piloncillo will melt into a thin layer, so you should add a little more than you think is necessary.) 

*Note: The easiest way to grate piloncillo is to chop or shave the piloncillo cones with a sharp knife.  DO NOT attempt to grate or shred piloncillo cones in a food processor!) 


Crumble about 1-1/2 cups of Queso Fresco over the piloncillo.  (Again, use more than you think is necessary, because it will melt and meld with the piloncillo.) 


Using your fingertip or a pastry brush, moisten the outer edge of dough with a little water.  Gently lay another circle of dough over the filling.


Press down gently on the unbaked Chorreada, to flatten the dough and filling slightly.  Pinch the edges of the two circles of dough together to seal in the filling.


With this recipe you can make two 10-inch Chorreadas, or divide the dough into 16 equal parts to make eight 6-inch mini Chorreadas.


Sprinkle top of dough generously with more crumbled piloncillo.  Cover and let rise for another 30 minutes.  Preheat oven to 350F.  (Important note: If baking Chorreada on a comal or small cookie sheet, slide a larger cookie sheet underneath to catch any melted piloncillo that might spill out onto the oven floor, creating a smoky mess throughout your house!)


Bake Chorreadas at 350F for  20 to 25 minutes, or until golden brown.  Cut the Chorreada con Queso into slices and serve with a tall glass of ice cold milk.  Enjoy!!! 


Now head on over to Girlichef's blog to wish her a Happy Anniversary and to check out her recipe for Puerquitos!


Photobucket


Also sharing this recipe with BYOB (Bake Your Own Bread) and YBR (Your Best Recipes) 

BYOB 125 x 125 


Pan Dulce: Chorreadas con Queso {She Made/Ella Hace}


I have been in love with chorizo ever since the summer my grandmother sent me to Mexico to learn Spanish when I was 4 years old.  Whether it be served with scrambled eggs for breakfast, mixed with beans or potatoes and wrapped inside a warm flour tortilla for lunch, crumbled on top my favorite Mexican Pizza  for dinner, or grilled at El Rancho during one of our big family cook-outs, chorizo continues to be one of my favorite meats ever.  So, when Heather (Girlichef) suggested that we cook with chorizo for this month's edition of She Made/Ella Hace, I couldn't have been happier!

And I knew just the recipe I wanted to try...The Homesick Texan's Chorizo & Asadero Cheese Bread.  Spicy pieces of chorizo, Asadero & Manchego cheese, and smoky bits of chipotle chilies, all wrapped in a soft, buttery dough...Sigh!  It's everything I love in one savory loaf of bread.   


Cheesy Chorizo Bread
(recipe slightly adapted from The Homesick Texan Cookbook by Lisa Fain)

Ingredients:
  • 1 packet yeast
  • 1/4 cup warm water
  • 1/4 cup butter
  • 1 cup whole milk
  • 1 large egg
  • 3 cups all purpose flour
  • 1 teaspoon salt
  • 1/2 pound Mexican Chorizo, crumbled and cooked
  • 1 to 2 canned chipotles, finely chopped
  • 1-1/2 cup grated Asadero cheese
  • 1 cup grated Manchego cheese

Directions:
Dissolve the yeast in the warm water in a large bowl; set aside.  Melt the butter in a small saucepan over medium heat.  Stir in the milk and the egg; whisk until well combined.  Pour the milk mixture into the yeast mixture; whisk until well combined.  Add the flour and salt to the liquids and stir until all of the flour has been incorporated. 


Knead the dough on a generously floured surface until smooth and elastic.  (About 5 minutes.)  Place the dough in a greased bowl; cover and let the dough proof (rise) for about 90 minutes or until double in size.   


Roll out dough onto a lightly floured surface to a 9 x 15-inch rectangle.  Sprinkle the chorizo and chopped chipotles all over the dough.  Top with 1 cup of the grated Asadero cheese and the Manchego cheese.  


Starting from the short end, roll up the dough tightly, like you would with cinnamon rolls.  Place the dough seam-side down in a greased 9 x 5-inch loaf pan.  Cover and let rise again for about an hour, or until the dough has passed a little over the top of the pan. 


Preheat the oven to 400F.  Brush the top of the loaf with melted butter, then top with the remaining Asadero cheese. Bake for 35 to 40 minutes or until the dough has turned a golden brown and sounds hollow when tapped.  Enjoy!!!    


Be sure to visit Girlichef's Blog to check out her Chorizo Verde AND Chorizo Stuffed Jalapeño Peppers.  


Photobucket

Also sharing this recipe with BYOB
BYOB 125 x 125


Cheesy Chorizo Bread {She Made/Ella Hace}


I have partnered up with my friend Girlichef  to bring you a new series called She Made/Ella Hace.  We're both American girls, married to gorgeous Mexican men.  See?  We already have a lot in common.  And we both love Mexican food.  The only difference is that Girlichef lives in the U.S. and I live in Mexico.  We don't always have the same ingredients available and we often times have different ways of preparing the same dish.  Once a month, we will choose a dish or ingredient to see just how different or similar our cooking styles really are.

For our first installment we chose Conchas, a classic Mexican pastry.  Growing up, I would only choose Conchas when we visited the local panaderia (bakery).  The Conchas always looked so pretty, I had a hard time choosing between the chocolate, vanilla and strawberry topped pastries.  All are delicious, but I've always had a weakness for the Chocolate.

One of the very first recipes I shared on this blog was my recipe for Conchas.  That was 2 years ago and well, times have changed.  The recipe is still pretty much the same, but I have made a few changes in my technique.  So I thought today would be the perfect time to share my New & Improved Concha Recipe with lots of step-by-step photos.

And be sure to visit Girlichef's blog to see her Conchas!!! 


Conchas

Ingredients:

Sponge
  • 1/2 cup all-purpose flour
  • 1/3 cup sugar
  • 1 packet instant or quick active dry yeast
  • 1/2 cup very warm water
Dough
  • 1/4 cup milk
  • 1/3 cup butter
  • 1 large egg
  • 1 teaspoon salt
  • 1 teaspoon ground cinnamon
  • 3 cups flour
Topping
  • 1 cup powdered sugar
  • 1 cup all purpose flour
  • 1/2 cup butter
  • 1 teaspoon vanilla
  • 1 tablespoon cocoa powder
  • 1/2 teaspoon ground cinnamon
  • 1 tablespoon strawberry milk powder 


Directions:
In a large bowl combine all of the sponge ingredients, except the water.


Stir in the very warm tap water.  If you're like me and don't have running hot water, just heat the water on the stove for a couple of seconds.


Cover the sponge with plastic wrap and let set for 10 to 15 minutes or until full of tiny little air bubbles.


While the sponge is proofing, heat the milk and butter in a small saucepan over medium heat just until the butter begins to melt.  DON'T let the milk come to a boil.  Remove from heat.  Don't worry about the butter.  The residual heat from the milk will continue to melt it.


Remove the plastic wrap and whisk in the milk and melted butter mixture, along with the egg, salt and ground cinnamon.


Stir in 2-2/3 cups of the flour until well combined.


Roll dough out onto a lightly floured surface and knead for about 5 minutes or until dough is smooth and elastic.  (If the dough gets too sticky, add 1 tablespoon of flour at a time until it's no longer sticky.)


Return dough to the mixing bowl.  Cover and let set for 60 to 90 minutes or until dough has almost doubled in size.


While dough is proofing, prepare the Concha Topping by combining the flour and powdered sugar in a medium bowl.


With a pastry blender or your handy dandy potato masher, cut in the butter until well combined.


Stir in the vanilla.


Continue to mix by hand until the sugar topping forms a ball.  Divide in three equal pieces and place each piece in a small bowl.  Stir in the cocoa powder and ground cinnamon into one of the doughs of sugar topping, mixing until well combined.  (Mixture might be sticky.  Do not add more flour.)


Stir the strawberry milk powder into one of the other doughs of sugar topping.  You could just use red or pink food coloring, but my kiddies love the added strawberry flavor.  And I have to admit, adding the strawberry milk powder reminds me of the delicious Conchas I used to eat at my Aunt Teddy's panaderia.


Leave one sugar topping ball of dough plain.  Refrigerate until ready to use.  (Refrigerating the dough will make it much easier to work with.)


Place the risen dough on the counter.  Look how soft and puffy that dough is!!!


Divide the dough in half.


Divide each half into 6 large or 12 small balls of dough.  Place seam side down on a lightly greased baking sheet.  Cover and let set another 20 minutes.  Preheat oven to 350F.


Meanwhile, divide each ball of sugar topping into 2 or 4 equal pieces, depending on whether you divided each half of the Concha dough into 6 or 12 pieces. 


Flatten each piece of sugar topping with your hands or between 2 pieces of plastic wrap until about the size of your Conchas.  


Lay each piece of sugar topping a top a ball of Concha dough; flatten slightly with your hands.   With the tip of your knife, score the sugar topping into decorative shapes.  Bake at 350F for 15 to 20 minutes or until the Conchas turn a light golden brown. 


Enjoy!!!

she made-ella hace conchas 1


Photobucket

She Made/Ella Hace {Conchas}